
Remember these?

In this tutorial, we’re going to take a look at how to make these galaxy pictures in watercolor! They’re simple to make and look spectacular – my favorite kind of technique. :3 In only three layers of color, and only an hour or two from start to finish (including drying times!), these galaxies are quick and fun to make. Best yet, you can finish several in an afternoon!
Let’s get started!
Materials
For this painting, you’ll need a few supplies: paints, brushes, water to clean your brushes, and watercolor paper. There’s also a few things that make painting a LOT easier, like masking tape and paper towels. I’ve got them all gathered here:

- Watercolor paint! You can use either pans or tubes of watercolor paint; here I’m using pans. The paint I’m using is the MALA line of paints from IKEA. They might be made for children, but I like them! They have good transparency, blend well, and are cheap – perfect for a beginner painter trying out new techniques. And this proves that you can make awesome art with cheap supplies.
- Opaque white watercolor paint. Here I’m using a liquid: Rublev Colors in Titanium White. Any white will do, as long as it’s opaque, because this is how we’ll make the stars! You could also use acrylic paint instead.
- Two cups of water, one to rinse brushes and one clean water for mixing colors.
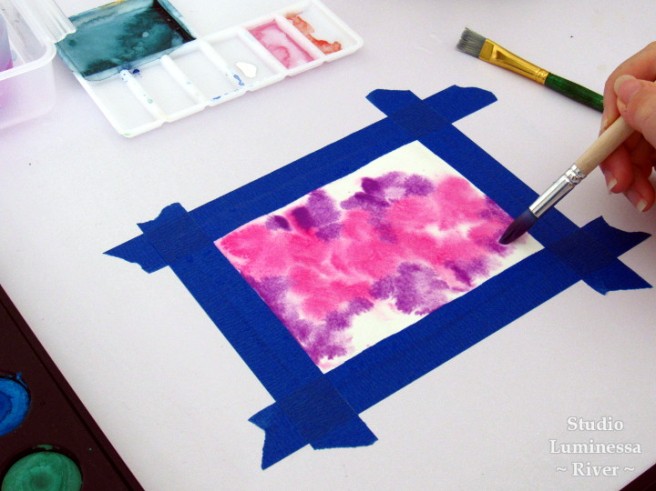
- Watercolor paper! Here I’m using a moderately thick 90 lb (190 g/m2) smooth paper from Strathmore. I prefer a smooth paper for the galaxies, but any paper will do; and the thicker the paper, the less chance of the paper rippling. And here I’ve taped it to provide a nice border & prevent it moving around as I paint.
- Watercolor brushes! Here’s our entire collection, but for this tutorial, we’ll only use three: A round brush, a flat brush, and a toothbrush. What is the toothbrush for, you ask? You’ll have to wait and see~ (Picture of brushes below.)
- A palette for mixing colors. Optional. Here I’m using it for the opaque white.
- Paper towels for wiping off the brush between colors or blotting off excess color. Technically optional. It helps keep your dirty water less, well, dirty so you can use it longer. It also helps with testing colors and getting excess color off your brush before you paint.
- Masking tape for securing your paper. Again, optional. I always tape as it helps the paper dry flat, and prevents it moving around. Here I’m using Frog Tape.
Here’s a close-up on the brushes:

The round brush is what we’ll paint with; the flat brush is for spreading water evenly on the paper; and the toothbrush is for making the stars! While you could technically even do this technique with just the round brush and flat brush, I found that the toothbrush makes splattering evenly so much easier.
A note before we begin: To make the stars, we’re going to splatter white paint. This can get messy! The paint goes everywhere! Before you start, make sure your work area is clear of anything you don’t want to get covered in white specks of paint, and that your table can be easily cleaned. Cloud and I have a dedicated art table that is easy to clean, so this isn’t an issue for us; if you don’t have a table that can get messy, remember to protect it first! Maybe lay down some cardboard or scrap paper first to protect your work surface – I don’t recommend newsprint as the water will cause the ink to run and might ruin your painting. Consider wearing a smock or apron when you splatter paint to protect your clothes.
Okay! Have you gathered your materials? Made sure you can splatter paint with no worries? Then let’s get painting!
Layer 1: The Base of the Galaxy
For this painting, I’m using five colors (plus white for the stars):

We’ll use them in this order:
- Pink
- Purple
- Bright blue
- Dark blue
- Plus, white for the stars! But that will be the very last step.
You can use any combination of colors! I like a bright center with the blue space background, so I keep coming back to pink. I also want to use black or indigo for the space portion one day – unfortunately, the MALA set’s black is really more of a warm charcoal gray, so it doesn’t work so well. Luckily, I like the blue background too. ^u^ Play around with different combinations and see what you like!
Since we’re using a pan, it helps to set a drop of water on each color and let it soak in for a minute. So while it’s soaking, let’s put water on the paper to start the wet-on-wet technique.
Step 1: Water wash
For the galaxy, we’re going to use a wet-on-wet technique to make that nice, diffuse, blended look. Starting with your taped paper, go ahead and wet it down lightly with the flat brush:

Stroke the flat brush with water horizontally across the paper from top to bottom. This will ensure an even base! After you finish, lightly touch the paper: It should be damp, not dripping. But if you add too much water and the paper ripples, that’s okay! We’ll look at how to deal with that later on.
Step 2: Add the pink
Now that the water’s soaked into the paint, go ahead and load up your brush with more water, and then with pink! The more pigment, the better. Then use the brush to drop dots of pink across the center of the wet paper wherever suits your fancy! The drops of paint will spread out to make the base of your galaxy:

Leave a few white patches in the center, if you can. This will add depth later on. If it ends up covered in pink, that’s fine, you can lift off some paint later for the white patches!
Step 3: Add the purple
We need to work quickly before the paper dries, so as soon as you’re happy with the center of your galaxy, clean your brush. Protip: This is where the paper towel comes in handy! Wipe your brush before rinsing in your dirty water cup, and it will take less time and effort to clean your brush. Your water will stay cleaner too!

Now that your brush is clean, load up your brush with purple. Then use the same dabbing technique to add purple around the edges of the pink base:
Let the two colors bleed into each other for a nice, blended effect. Now they kind of look like clouds, right?
Step 4: Add the blues for the background
Now load up your brush with bright blue and add it around the purple. Let the bright blue and purple blends; you can even paint over the purple to change the shape of the galaxy. Leave a few blank spots at the very edges for the dark blue, and add it as soon as you’re done with the bright blue. Let the two blues blend a lot to add depth and variety to the background:

Step 5: Clean up the pooling colors
In the last photo, you can see that I have some dark blue pooling at the edges of the painting. Luckily, it’s easy to fix! Clean your brush well, then dry it on the paper towel. Using your slightly damp, almost-dry brush, gently touch the areas of pooled pigment to soak it up. Like so:

Your dry brush will leave little white spots, but never fear! As long as the paper is still damp, the pigment will diffuse again and erase the white spots. This is also the same technique you can use to make lift some pink from the center of the galaxy. Just let the paint dry a little first, so it doesn’t diffuse as much. Like so:

Now, step one is complete!

Let the painting dry completely. For me it took about 15 minutes. When dry, the paper should have little to no ripples, and be matte instead of shiny (as it is with water). The colors will also be somewhat lighter when dry.
At this point, if you like the intensity of the colors, you can skip to Layer 3: The Stars! If your painting is more faded or lighter than you would like, then join me as we add another layer of colors to brighten it up!
Layer 2: Increasing Intensity
For Layer 2, we’ll use the wet-on-wet technique again to add more color and definition to the galaxy.
Step 1: Wet the paper again
Because we already have dry pigment on the paper, we need to use a light touch with the water wash – or the paint will come up! So take your flat brush, wet it, and blot the excess water off on your paper towel. Then brush across the paper horizontally, from top to bottom:

Your previous layer may start blending slightly, or become a little more vague and indistinct. That’s okay! We’ll be covering it with more pigment, so you won’t notice it later.
Step 2: Add the colors
Now that our paper is damp again, we’ll add more colors in the same order as the first layer: Pink, purple, bright blue, and dark blue. Yep, same steps, same colors! Just like so:

Now, you don’t have to exactly follow the outlines you laid down on Layer 1. Feel free to play with the shapes of the galaxy. In part 2 of the picture above, you can see I added more purple on the second layer, changing and defining the shapes of the clouds.
Step 3: Clean-Up
In Step 2, above, I’ve made an effort to keep the white centers of the galaxy white, but it’s easy to paint over them. If you do, no worries! Just lift off the paint when the paper is semi-dry. Same with pooling: Use the dry brush technique to lift the excess paint off.
Now that Layer 2 is done, it’s time to let it dry completely! Wait about 10-15 minutes, then check if the paper is dry to the touch. At this point, you could go ahead and add another layer if you want. If you like how it looks, it’s time to add the stars! \(^o^)/
Layer 3: The Stars
This is the fun part! We’re going to take opaque white watercolor paint and splatter it across the paper. The toothbrush comes in handy here! Pour a small amount of white on your palette, dip your toothbrush in, and get ready to splatter!
(If you don’t have a spare toothbrush for painting, a flat brush or other stiffer brush could also work.)
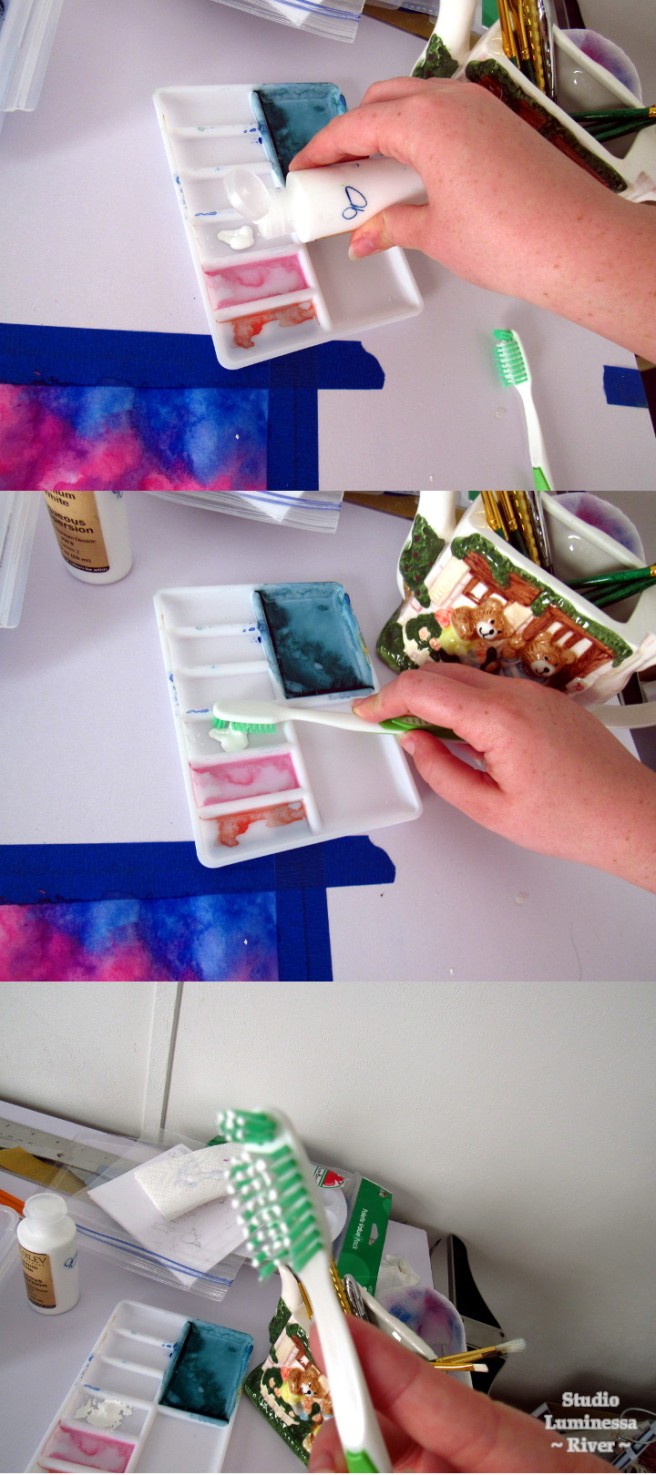
Now hold the toothbrush above the paper. It doesn’t have to be parallel, a slight angle works fine. Then run your index finger over the bristles from top to bottom, “flicking” the paint off the brush and onto the paper.

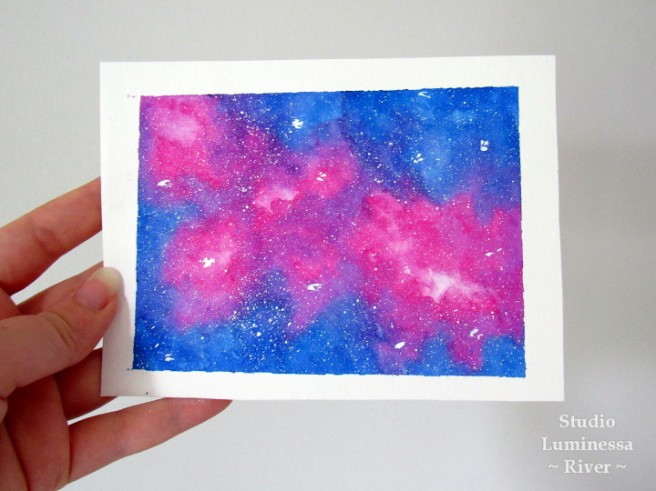
Splattering creates a nice, random arrangement of stars to light up your galaxy! 😀
If your stars turn out tiny, or you’d like some variation, you can add some bigger stars with the round brush and the opaque white paint:

And now you’re done! Let the last layer dry. Once it’s dry, you can carefully pull the tape off of the paper!
Now that your painting is finished, you can seal it to preserve it and protect it from water. However, I personally have not sealed my watercolor paintings and have no experience doing so because I don’t have any sealer. Sealant is on my list of things to get next time I buy art supplies, though! If you have any recommendations, let me know in the comments below!
Enjoy your watercolor galaxy! 😀
~Fin~
Hope you liked this tutorial! If you paint a galaxy, I’d love to see it! You can post it in the comments or use my Contact page to send me a link.
Special thanks to Cloud for being my patient photographer, even when I wouldn’t hold still long enough for her to snap the photo! You’re the best, Cloud!
And thanks also to Yureya, who kindly requested I make this tutorial! Thank you for encouraging me, Yureya!
If there’s any other tutorials you’d like me to make, let me know! I’d love to hear your suggestions! 🙂

Just beautiful work! I really need help with watercolors because I lack patience and almost always wind up with a mess. ^^;;; I loved your tutorial and even looking at the colors makes me happy. ❤
LikeLiked by 2 people
Thank you! I’m happy you like them, especially since you do such beautiful work yourself! (^///^)
I have very little patience myself, so I don’t like doing anything too fussy. Luckily, watercolors are very forgiving, and most “mistakes” – splotches and the like – can easily be incorporated into the work. It makes it unique! These galaxies are a perfect example of that, I can’t tell you how many times I made splotches on them – but you wouldn’t know it looking at the finished piece, right? 🙂
LikeLike
Thanks for this tutorial. I have been practicing and sometimes forget to do the layers three times for so.
LikeLiked by 1 person
I’m glad you like it! 🙂
Don’t worry about it! Adding extra layers serves to intensify the colors. Also, depending on the paint you use, the intensity may vary – the MALA paints I used here can get a little washed out. So it’s up to you: if you like the delicate look of only 1-2 layers, it’s fine to leave it like that! I prefer my galaxies to be more vibrant, so that’s why I like to go over it a couple of times. ^^
LikeLiked by 1 person
Very well written and presented tutorial – when I started painting galaxies I found such tutorials very useful. Watercolour is a great medium and I’ve found it greats so many wonderful textures.
I have been producing a series of galaxy-inspired paintings for some months now; you may be interested to have a look here: http://cjwaterfieldart.com/portfolio_category/cosmic-paintings/
LikeLike
Thank you! I’m glad you think this tutorial will be helpful to people just beginning watercolor paintings. I like using this technique as it is so simple, it’s almost impossible to “mess up” and yet looks so cool when finished. 🙂
Your paintings are quite lovely. It’s wonderful the way you use animals in your sky paintings, the two parts complement each other well. Thanks for sharing! 🙂
LikeLike
Galaxy anything is so awesome, and these are beautiful! I can’t paint at all but this made it look a little less scary 😅
LikeLiked by 2 people
Aww thank you Millie! 😊
They’re super easy to do, so it’s a lot of fun! Not intimidating at all, I hope. I’m a total beginner with watercolors, and I could do them, so. . . 😉
LikeLiked by 2 people
Ooh, these are absolutely beautiful – the night sky is one of my favorite things! Wonderful tutorial, and the pictures are fantastic, Cloud! ^_^ I’m artistically challenged, but I might just give this a try – your instructions are so clear and helpful, and the finished paintings turn out gorgeous! I’m with you that the simple & pretty things are my favorite. 🙂
LikeLiked by 2 people
Thank you Claire! I’m glad you like the tutorial & that you think the instructions are so clear – I was a little worried about that.
Cloud and I are total beginners when it comes to watercolors, so when she showed me a video about painting galaxies we just had to try it out. (This is the video: https://www.youtube.com/watch?v=ckd8eObFFtc ) We made some changes in technique based on the paints we had, so this is our version. Simple and pretty definitely is best! ^^
If you try it out, we’d love to see the result! C:
LikeLiked by 2 people
Yes, do it! And then show us pictures! 😀
And thank you, I’m glad you think they turned out well! (Even if River wouldn’t stay still. . . XP)
LikeLiked by 2 people